One of the strongest and most obvious draws of learning to code is the earning potential for coding and programming professionals. The Bureau of Labor Statistics (BLS) tracks salary and other important workforce information for a variety of careers.
` - it contains more detailed information shown under the key information after click
> At the moment there's a single accordion element. You'll add more of them later on.
After that, create a new file *accordion.css*:
```css
.outer {
position: relative;
padding-left: 50px;
line-height: 40px;
color: #082c42;
}
.inner {
position: absolute;
left: 0;
}
.inner::before {
content: url("images/button.svg");
width: 40px;
height: 40px;
position: absolute;
}
.inner::after {
content: "•";
position: absolute;
width: 40px;
text-align: center;
font-size: 40px;
color: #082c42;
}
```
Here you have 4 elements on 3 levels:
- `.outer` is a container whose only purpose is to hold some text and `.inner` span.
- `.inner` that holds `::before`/`::after`
- `::before` and `::after`
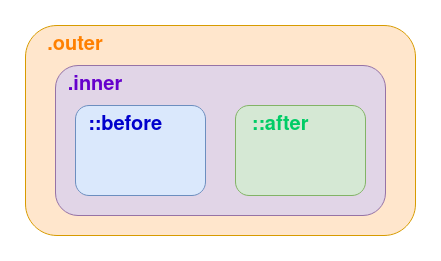
`.outer` is a container for your single bullet. The position of all the absolute positioned elements is based on a non-statically positioned ancestor. By setting the position to relative, you don't move the container, but you make it non-static, so all our absolute positioned elements will be positioned regarding the `.outer`. You set the line-height on `.outer` so all descendants will have the same line-height - that makes it easier to align them. With padding on the left, you get a little breathing room where you will now have space to put your pretty bullet.
`.inner`'s purpose is to contain `::before` and `::after`. It doesn't hold anything but that. Both, `::before` and `::after` will be positioned furthest to the left, thus we position their parent as absolute with `left: 0`.
With the `::before`'s help, we show that pretty 3D button.
Next, create a new directory "images". After that, download the image for the bullet [here](https://gitlab.com/GirlThatLovesToCode/pretty-accordion/-/tree/master/images) and store it inside "images".
Because it's an SVG you're able to set width and height. That works because the element is positioned absolutely. By default, `` is an inline element and you can't define its width or height. But any element that is positioned absolutely, automatically acts as a block element.
`::after` is containing a bullet(•). By making the element the same width and height you make it easier to put it in the middle of the larger circle just with `text-align: center`
> Read about `::before` and `::after` [here](https://girlthatlovestocode.com/css-pseudo-elements-before-and-after)
## Add JavaScript
Once you hace HTML and CSS ready you need to add JavaScript. Add a new file *accordion.js*.
```js
$(document).ready(function() {
$( ".outer" ).click(function() {
$(this).closest(".tab").toggleClass("active");
})
})
```
The color of the middle circle on the bullet should change when clicked on. You can accomplish that by adding another class on the parent tab of the clicked `
One of the strongest and most obvious draws of learning to code is the earning potential for coding and programming professionals. The Bureau of Labor Statistics (BLS) tracks salary and other important workforce information for a variety of careers.
One of the strongest and most obvious draws of learning to code is the earning potential for coding and programming professionals. The Bureau of Labor Statistics (BLS) tracks salary and other important workforce information for a variety of careers.
When compared to the national average of five percent growth, you can see that a handful of positions are outpacing a lot of other careers. Computer programmers are an interesting outlier from this group, but some believe these projections are influenced by computer programming skills blending into other related in-demand tech roles.
Coding, in its most basic terms, is just assigning a computer a task to do based on the logical guidelines you’ve outlined. Highly complex tasks are essentially a collection of smaller operations once you break them down. This methodical and logic-heavy approach to problem-solving can be a boon for figuring out problems beyond a coding challenge. `. So when the user click on the `
`, parent tab is found by `$(this).closest(".tab")`. `toggleClass` is a wonderful jQuery function, that adds or removes a class.
You need to include jQuery and *accordion.js* inside *accordion.html*:
```html
Coding and programming careers have great earning potential
`. You'll see that class gets added or removed on the `.tab` when you click. Visualy, there are no changes yet. To do that you have to target the smaller circle with `.inner::after` when `.tab.active` in your css and set it to different color:
```css
.tab.active .inner::after {
color: #bfd7ed;
}
```
Now, if you click on it repeatedly, it alternates colors based on class `active`.
## Hide detailed content
Detailed content should not show at first. It should slowly slide down when you click on `
` (when the tab is `active`) and slide back up when you click on it again.
To do that you need to add a new class to *accordion.css*:
```css
.hide {
display: none;
}
```
To add slide effect you need to use `slideToggle` function. Edit your *accordion.js* to look like this:
```js
$(document).ready(function() {
$( ".outer" ).click(function() {
$(this).closest(".tab").toggleClass("active");
$(this).siblings(".hide").slideToggle("slow");
})
})
```
The added line is pretty similar to the previous one. It finds a sibling of the clicked element that has a class `hide` and toggles the slide. Now, when you click on the `.outer`, the bullet changes color, and the content either opens or closes.

## Accordion
You can't really call it an accordion if it contains only one tab. so let's fix this. Edit your *accordion.html* to look like this:
```html
Coding and programming careers have great earning potential
Demand remains strong for coding-related jobs
Coding ability gives new perspective to problem-solving
` on which you clicked, it moves to its tab parent. Then it finds tab's siblings that have class `active`. If you did that correctly, there shouldn't be more than one active tab. After that, it slides up the child with class `hide`, and then it removes the `active` class from the found tab.
If you play around a little in your browser, you can see that now there is always max one tab open, but you can also close the open one.
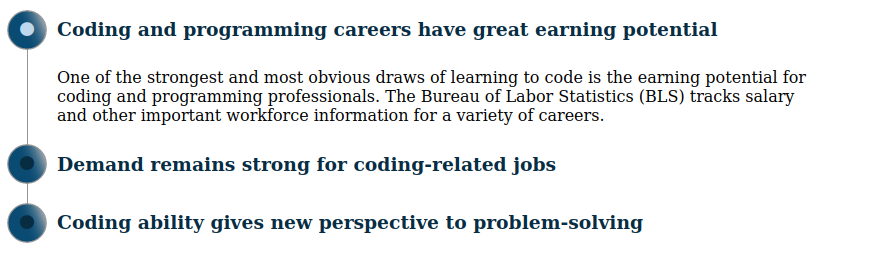
If you paid attention, you'll notice that you're not finished yet. There's a little skip when the text is sliding up and it doesn't look good.
That's because you have an unwanted margin for `
`. It is added by the browser.
## Last CSS fixes
Because there's only one thing on your page, you won't include a whole file but just remove the border instead. Add `margin: 0;` to `.outer` inside *accordion.css*:
```css
.outer {
position: relative;
padding-left: 50px;
line-height: 40px;
color: #082c42;
margin: 0; /* newly added */
}
```
Another browser-applied border that makes things look wrong is `margin-top` on `.hide`. Set this to 0, too:
```css
.hide {
padding-left: 50px;
display: none;
margin-top: 0; /* newly added */
}
```
As you can see, you set the margin of `.outer` to 0 and when the text is closing it doesn't skip anymore. You also broke design, but that's easily fixable. Add a little padding at the bottom of `.outer`:
```css
.outer {
position: relative;
padding-left: 50px;
line-height: 40px;
color: #082c42;
cursor: pointer;
margin: 0;
padding-bottom: 15px; /* newly added */
}
```
Now you created another problem. Because of the padding, the line on the left side doesn't end with the last bullet. Padding should be applied for all the bullets except for the last one. You can find the last tab with `:last-child` and apply 0 padding at the bottom of its child `.outer`.
```css
.tab:last-child .outer{
padding-bottom: 0;
}
```
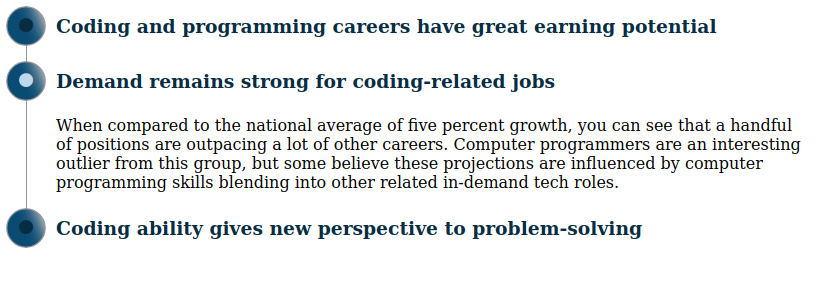
And this is it! Here's your pretty accordion:
> In a real application, you'd probably want to use a CSS Reset file like [this one](https://github.com/murtaugh/HTML5-Reset/blob/master/assets/css/reset.css) or maybe a [simpler one](https://github.com/vladocar/CSS-Mini-Reset/blob/master/CSS-Mini-Reset.css).
## Conclusion
You have a pretty accordion to show, but you also learned so many things that you can use anywhere.
You learned:
- How to combine `::before` and `::after` to create a beautiful effect
- How to toggle class
- How to apply different style by adding a class with JS
- How to toggle hidden/shown content
- That sometimes browsers break your design by applying their own
I hope you'll be able to create many more beautiful things with the knowledge you gained in this tutorial.
Whole code is visible [here](https://gitlab.com/GirlThatLovesToCode/pretty-accordion)
> Text taken from: https://www.rasmussen.edu/degrees/technology/blog/why-learn-to-code/