


What is HTML Canvas?
HTML's <canvas> element is a rectangular area for graphics.
By default, it has no content. We can draw on it with JavaScript.
It is supported in all modern browsers and unlike flash, the user doesn't need to install any plugin.
It enables user interaction and more dynamic websites.
Check this mesmerizing vortext or this fun interactive demo of gravity points.
There are also many web games created with HTML Canvas.
What will you learn in this tutorial?
Once you finish the tutorial, you will have the basic knowledge of HTML Canvas. You will know how to create 3 types of shapes - rectangle, triangle, and circle and how to position them on canvas. Moreover, you will learn how to create a linear-gradient background and will be able to write on canvas.
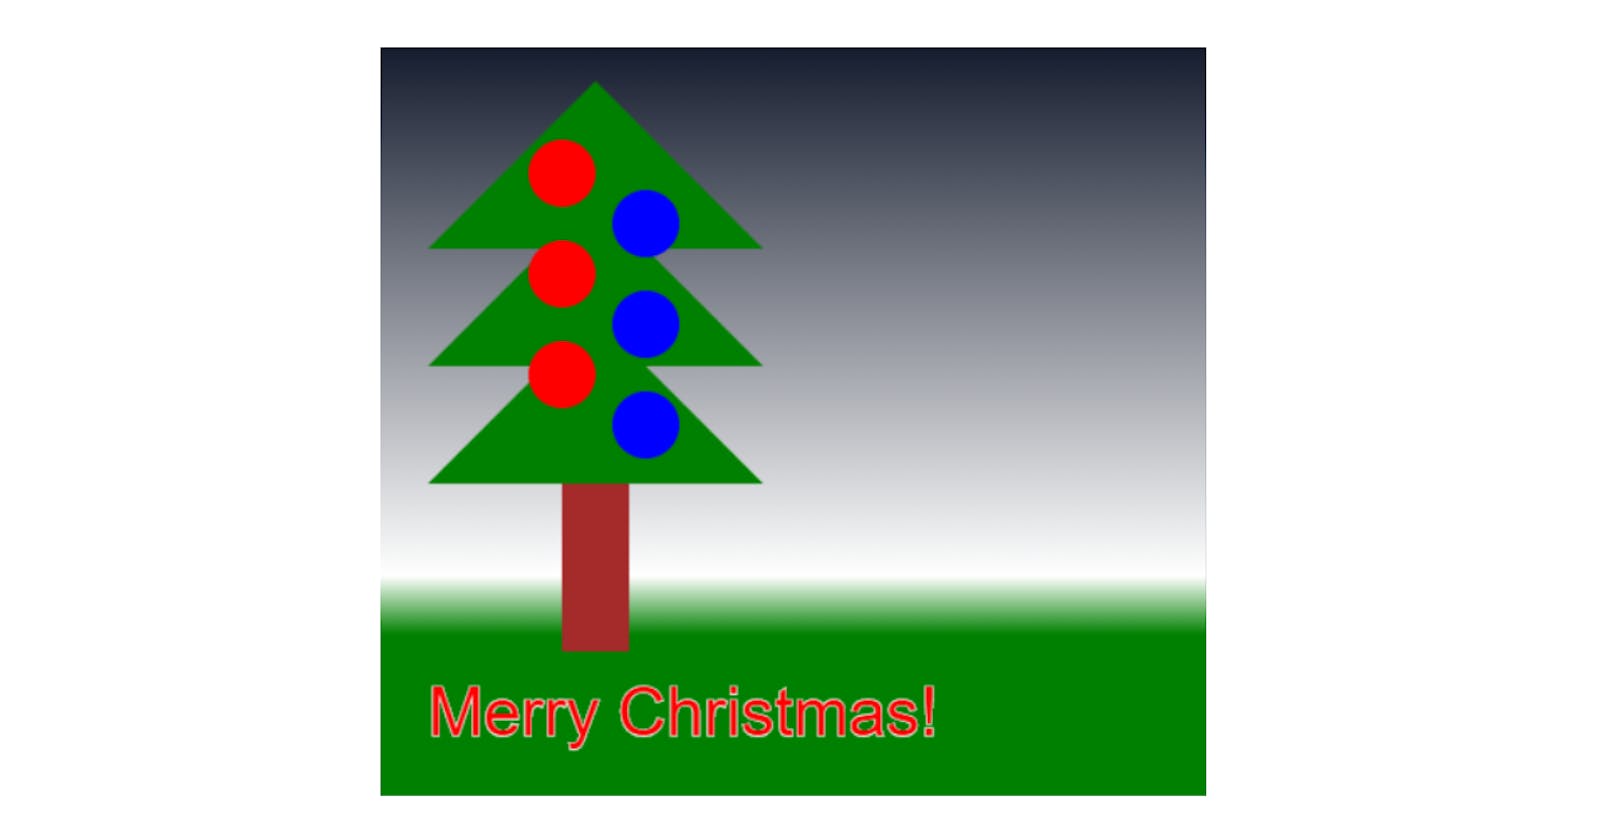
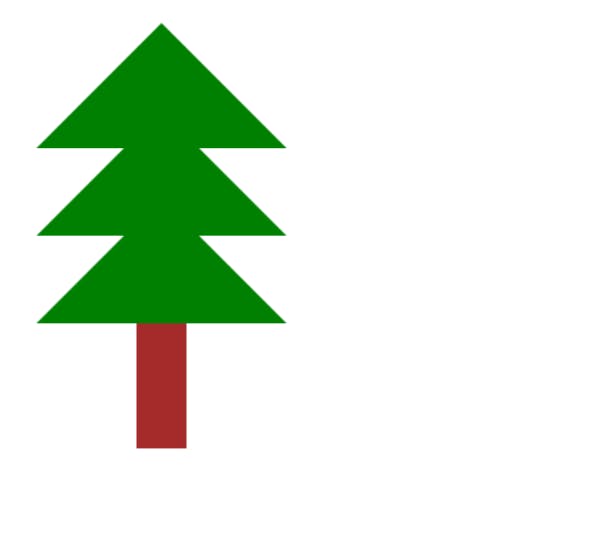
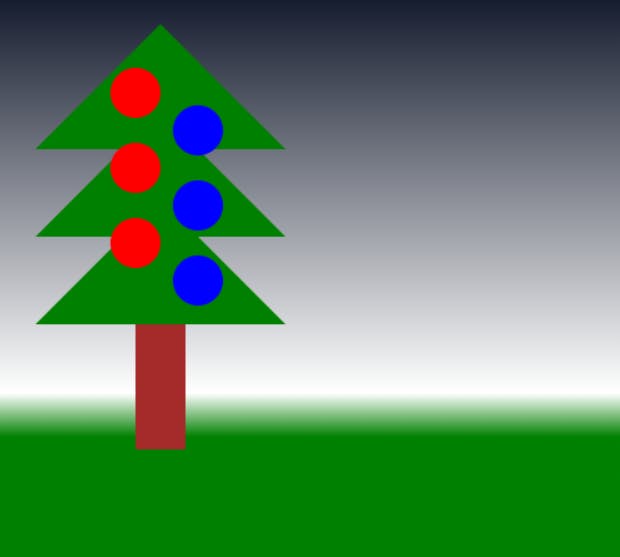
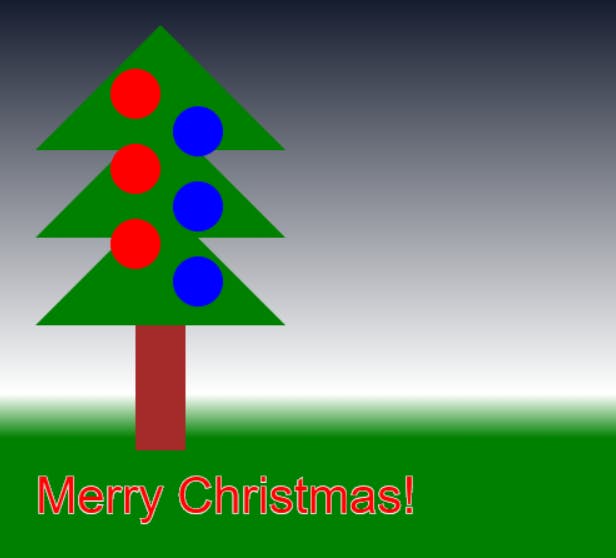
You also will have something to show - you will have a web Christmas card, that will look like this:

Prerequisites
- basic knowledge of HTML
- basic knowledge of JavaScript (variables, functions, for loops)
To avoid confusion, in this tutorial you'll be using 'classic' JavaScript, ES5.
Basics of Canvas
To use canvas you need a pretty simple HTML file containing <canvas> element inside its body:
<!doctype html>

<html lang="en">

<head>

   <title>Awesome canvas</title>

</head>

<body>

<canvas id="canpic" width = 500; height = 450;>
    Your browser does not support the canvas element.
</canvas>

</body>

</html>
The attribute id is set on <canvas> so it can be referenced from JavaScript. We also set width and height on the element, although you could also set them via JS.
The Your browser does not support the canvas element. between <canvas> and </canvas> is shown in older browsers that don't support canvas.
Read more about graceful degradation.
HTML canvas works like a real-world canvas, except rather than an oil painting it is a pixel painting. A circle you drew on canvas is just like dried paint - its pixels replaced everything that was there before. That circle can't be moved or remolded into something else.
Don't worry if that is hard to grip. Just keep it in mind while you follow this tutorial. So let's get our hands dirty.
Christmas card
Our Christmas card will consist of:
A Christmas tree - 3 identical overlapping triangles to form a tree crown and a square for a trunk. We'll create two functions. The first one, that draws a triangle - it's called 3 times with different coordinates. And the second one that draws a square (to get a trunk).
There will be 6 baubles of 2 different colors on the tree. We will draw them as circles with arc.
A background will be blue on the top, white in the middle, and green on the bottom. We will use linear gradient.
On the green, underneath the tree, we'll write a message.
The tree
First, create a new folder named Canvas. Inside that folder create an HTML file named canvas.html with a container for canvas:
<!doctype html>

<html lang="en">

<head>

   <title>Awesome canvas</title>

</head>

<body>

<canvas id="canpic" width = 500; height = 450;>
    Your browser does not support the canvas element.
</canvas>

<script src="canvas.js"></script>

</body>

</html>
It's the same content as above mentioned basic canvas HTML example with the added import of javascript file named canvas.js at the end of the body.
Next, create canvas.js file next to canvas.html.
const canvas = document.getElementById("canpic"); // get canvas element from HTML by ID
const ctx = canvas.getContext("2d");
First, we need to prepare our canvas for drawing. We do this by getContext method, which returns the drawing context on the canvas. It takes two arguments- context type and context attributes if there are any. We'll be drawing in two dimensions so we select 2d without any context attributes.
You can read more about
getContextmethod here
Next, let's draw a green triangle:
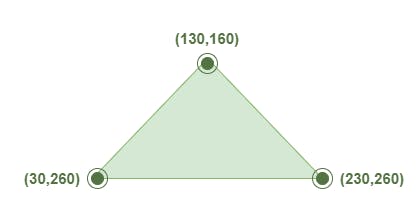
const canvas = document.getElementById("canpic");  // get canvas element from HTML by ID

const ctx = canvas.getContext("2d");

ctx.fillStyle = "green";

ctx.beginPath();

ctx.moveTo(30, 120);

ctx.lineTo(130, 20);

ctx.lineTo(230, 120);

ctx.fill();
First, we set our fill color to green. Second, we start drawing with beginPath. Using method moveTo(x, y) triangle starts we start drawing triangle in its bottom left corner located at y = 120 and x = 30.Triangle's top point will be at y = 20 and x = 130. The rightmost point will be at the same height as the first one but furthest to the right. Open canvas.html in the browser to see the green triangle you've just drawn.
Drawing in canvas starts at the top left corner and progress to the bottom right corner. The bigger the x is, the more you are to the right. The bigger the y is, the more you are to the bottom.
So far there is only one triangle but we need t(h)ree of them! We're programmers, we're not gonna write all this code 3 times. So let's wrap the drawing of the triangle into a function:
const canvas = document.getElementById("canpic");  // get canvas element from HTML by ID

const ctx = canvas.getContext("2d");


function drawTriangle(x, y) {

ctx.fillStyle = "green";

ctx.beginPath();

ctx.moveTo(x, y);

ctx.lineTo(x + 100, y-100);

ctx.lineTo(x + 200, y);

ctx.fill();

}
Instead of hardcoded numbers, there are x and y for our starting point. The other 2 points we calculate based on the first point, the same way we did before. Now we'll call that function 3 times to draw a tree crown like this.
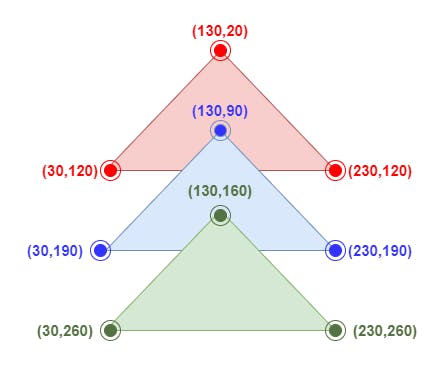
So let's draw:
const canvas = document.getElementById("canpic");  // get canvas element from HTML by ID

const ctx = canvas.getContext("2d");


function drawTriangle(x, y) {
  ctx.fillStyle = "green";

  ctx.beginPath();

  ctx.moveTo(x, y);

  ctx.lineTo(x + 100, y-100);

  ctx.lineTo(x + 200, y);

  ctx.fill();
}


drawTriangle(30, 120); //red triangle

drawTriangle(30, 190); //blue triangle

drawTriangle(30, 260); //green triangle
We are drawing the triangles one below the other, so x is the same. For x and y of the first triangle, we'll take the same values as for a single triangle in the initial example. The next two triangles will be positioned below the first one. Refresh your canvas.html in the browser. You should see the tree crown of the Christmas tree.
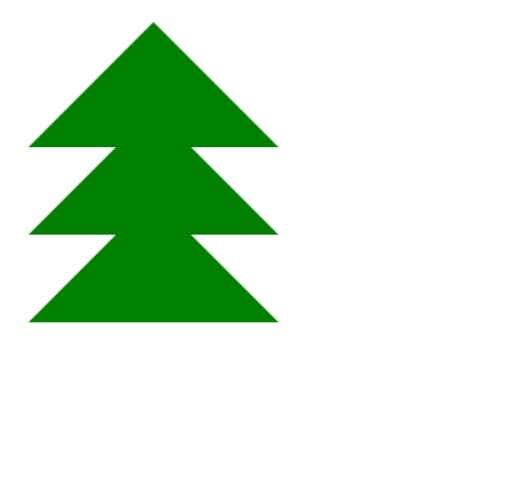
The only thing missing is the square trunk. We draw squares with the function fillRect(x, y, width, height).
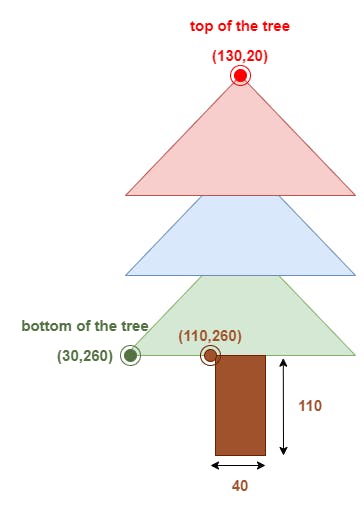
The trunk will be touching the lowest triangle of the tree crown. Half the trunk will be to the left of the middle of the tree and half to the right. So we set x value to middleOfTheTree - halfWidthOfTheTrunk. We'll also need to change the color. To add the trunk just add this part at the end of canvas.js:
ctx.fillStyle = "brown";
ctx.fillRect(110, 260, 40, 100);
Refresh your browser to see the full tree.
Congratulations, you've just drawn your first picture with HTML canvas!
The decorations
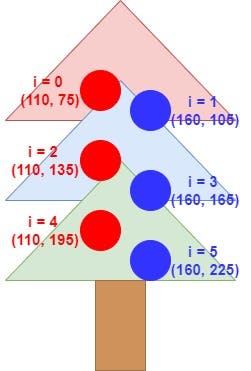
The tree doesn't look very festive yet. We need to decorate it! We are going to create 6 baubles - 3 colored red and 3 colored blue. Red ones will go to the left and blue ones to the right.
Let's add drawing of the baubles at the end of canvas.js:
var y = 75;

for (var i = 0; i < 6; i++) {

   ctx.beginPath();

   if (i%2 == 0) {

       ctx.fillStyle = 'red';

       ctx.arc(110 , y, 20, 0, 2 * Math.PI);

       ctx.fill();

   } else {

       ctx.fillStyle = 'blue';

       ctx.arc(160, y, 20, 0, 2 * Math.PI);

       ctx.fill();

   }

y = y + 30;

}
We use for loop to draw 6 baubles. Even loop numbers will create red baubles on the left and odd numbers will create the blue ones. We use modulus operator to check whether i is even. Depending on that, we choose fillStyle and position(x, y) of the circle. We create circle shape with arc() method. We create a circle by starting a curve on 0 and ending it on 2*Math.PI. Each time, we need to increase y for 30, no matter the color of the bauble to move down.
arc(x, y, radius, startAngle, endAngle) method creates a curve, that can be, but is not necessarily, a circle. Both angles must be in radians. 2 * Math.PI of radians is the same as 360°
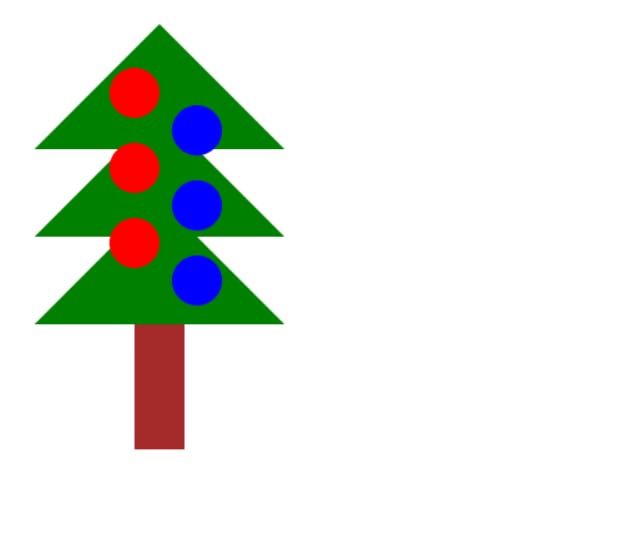
Congratulations, your tree is now decorated!
Background
Background can be created with linear gradient. We'll start with blue for the sky on the top, green for the grass on the bottom. Because the gradient between those 2 colors would look terrible, we'll create a 'sun-just-went-down' effect and put white in the middle.
Add this at the end of canvas.js:
var backgroundLinear = ctx.createLinearGradient(0, 0, 0, 350);

backgroundLinear.addColorStop(0, "#151c2e");

backgroundLinear.addColorStop(0.9, "white");

backgroundLinear.addColorStop(1,"green");

ctx.fillStyle = backgroundLinear;

ctx.fillRect(0, 0, 500, 450);
We create gradient with createLinearGradient(xStart, yStart, xEnd, yEnd) method. Because we want gradient from top to bottom, we set beginning coordinates at 0. Because we don't want the gradient tilted we leave the xEnd at 0. To have a grass effect we stop the gradient at 350 which is before the end of the image at 450. The color of the background between the gradient end image end will be filled with solid green. For each color, we add a addColorStop(color, position between start(0) and end(1) of gradient) method. You already used fillStyle for objects we draw before. This time, instead of some color, we select previously created backgroundLinear. We use fillRect to draw the background on the canvas.
Refresh your browser. What happened? Everything we draw before disappeared! In the beginning, we talked about pixels being completely replaced - that's what I was talking about. Just like with the real-world canvas, if you first create some shapes and then the background, shapes are not seen anymore. Don't worry, that's easy to fix. You just have to move the background code on the top - before the tree is drawn:
const canvas = document.getElementById("canpic");  // get canvas element from HTML by ID

const ctx = canvas.getContext("2d");


function drawTriangle(x, y) {
  ctx.fillStyle = "green";

  ctx.beginPath();

  ctx.moveTo(x, y);

  ctx.lineTo(x + 100, y-100);

  ctx.lineTo(x + 200, y);

  ctx.fill();
}


var backgroundLinear = ctx.createLinearGradient(0, 0, 0, 350);

backgroundLinear.addColorStop(0, "#151c2e");

backgroundLinear.addColorStop(0.9, "white");

backgroundLinear.addColorStop(1,"green");

ctx.fillStyle = backgroundLinear;

ctx.fillRect(0, 0, 500, 450);


drawTriangle(30, 120); //red triangle

drawTriangle(30, 190); //blue triangle

drawTriangle(30, 260); //green triangle


ctx.fillStyle = "brown";
ctx.fillRect(110, 260, 40, 100);

var y = 75;

for (var i = 0; i < 6; i++) {

   ctx.beginPath();

   if (i%2 == 0) {

       ctx.fillStyle = 'red';

       ctx.arc(110 , y, 20, 0, 2 * Math.PI);

       ctx.fill();

   } else {

       ctx.fillStyle = 'blue';

       ctx.arc(160, y, 20, 0, 2 * Math.PI);

       ctx.fill();

   }

y = y + 30;

}
Refresh your browser again, you should see the tree on the background you've just added.
Greeting
When we are creating a Christmas card, we want to write some good wishes on it! Fortunately, canvas has a simple method to do that. All the shapes you created on canvas (rectangle, arc, and text) can be drawn in two ways. You can either draw them filled with color (so far we used that) or just stroke their shape out. You can also do both.
Let's add Merry Christmas to your card by adding this code to the end of canvas.js:
ctx.strokeStyle = 'white';

ctx.fillStyle = 'red';

ctx.lineWidth = 1;

ctx.font = '40px arial';

ctx.strokeText('Merry Christmas!', 30, 410);

ctx.fillText('Merry Christmas!', 30, 410);
First, we select a color for stroke. Then we select fill color. after that, we select lineWidth for the stroke and the font family.Finally we create stroked strokeText(text, x, y)) and filled (fillText(text, x, y)) text.
You can see the whole code here.
Conclusion
In this tutorial, you learned how to create 4 types of elements:
- triangle with commands:
- beginPath()
- moveTo(x, y)
- lineTo(x, y)
- rectangle with a command:
- fillRect(x, y, w, h)
- circle with a command:
- arc(x, y, radius, startAngle, endAngle)
- text with commands:
- strokeText(text, x, y)
- fillText('text', x, y)
You also learned that you need to select fill color if you want your shape to be visible on the canvas. You can color it 2 ways:
- Fill color:
- fillStyle(color)
- Gradient
- createLinearGradient(0(xStart, yStart, xEnd, yEnd));
- backgroundLinear.addColorStop(color, position beetween start(0) and end(1));
- fillStyle(gradient)
Besides that, you've also learned how to use basic shapes like triangles to draw more complex shapes like a tree crown.
And let's not forget, that you've just created a beautiful Christmas card that you can share with your close ones.
What's Christmas without gifts? You can learn how to create them and much more in Part 2