
Fluent in Django: 8 Django template tags you should know
I'm passionate about learning new things -- both for myself and for teaching others. I'm a fan of Python and Django and want to know everything there is about those two. When I'm not writing code or a blog, I'm probably trying something new, reading, or spending time outside with my family.
Intro
Django templating language (Django's default out-of-the-box templating language) comes with dozens of tags that make your template powerful and allows you to do many many things.
Tags provide arbitrary logic in the rendering process and they are located inside {% %} (unlike variables that are in the double curly braces - {{ }}).
Some of the tags you probably know are:
- for loop (
{% for i in numbers %}) - if (
{% if i > 10 %}) - extends (
{% extends "base.html" %}) - block (
{% block title %})
But there are less known tags that can make your life easier. To get to know some of them, we'll work on the expense tracker.
Prerequisites
You will need the basic knowledge of Django. If you don't feel comfortable with Django yet, try this beginner-friendly tutorial.
Initial setup
Start with setting up a new Django project:
$ mkdir django_template_tutorial
$ cd django_template_tutorial
$ python3.9 -m venv venv
$ source venv/bin/activate
(venv)$ pip install Django
(venv)$ django-admin startproject django_templates .
Create a new app:
(venv)$ django-admin startapp tutorial
and register it:
# django_templates/settings.py

INSTALLED_APPS = [
    'django.contrib.admin',
    'django.contrib.auth',
    'django.contrib.contenttypes',
    'django.contrib.sessions',
    'django.contrib.messages',
    'django.contrib.staticfiles',
    'tutorial',
]
Create a model called Expense:
# tutorial/models.py
from django.db import models


class Expense(models.Model):
    datetime = models.DateTimeField()
    name = models.CharField(max_length=100)
    amount = models.FloatField()
Create and run the migrations:
(venv)$ python manage.py makemigrations
(venv)$ python manage.py migrate
If you got lost during the initial setup, I encourage you to go back to basics.
Create a folder called templates inside the tutorial folder and inside it, another folder, again called tutorial.
Inside this structure, create a template called expenses.html:
django_templates
    └── tutorial
        └── templates
            └── tutorial
                └── expenses.html
Confused about the directory structure? Read about Django template resolving in first part (Template chapter).
Now we need to create an url where our template will be shown.
Open django_templates/urls.py and include tutorial's urls in it:
# django_templates/urls.py

from django.contrib import admin
from django.urls import path, include  # this is new


urlpatterns = [
    path('admin/', admin.site.urls),
    path('', include('tutorial.urls')), # this is new
]
We haven't created tutorial/urls.py yet. Create the file and define just the root url:
# tutorial/urls.py

from django.urls import path
from tutorial import views

urlpatterns = [
    path('', views.expenses_list),
]
And the last thing is to create a view called expenses_list:
# tutorial/views.py

from django.shortcuts import render
from tutorial.models import Expense


def expenses_list(request):
    expenses = Expense.objects.all()

    return render(request, 'tutorial/expenses.html', {'expenses': expenses})
Run the server:
(venv)$ python manage.py runserver
If you navigate to http://127.0.0.1:8000, you'll see an empty page. Now we can finally get to our template.
Starting with the template
In the real-world application, you'd make a base template and extended it with {% extends %} tag, but we'll have only one template, so add the following:
<!--tutorial/templates/tutorial/expenses.html-->

<!DOCTYPE html>
<html lang="en">
<head>
    <meta charset="UTF-8">
    <title>Expenses</title>
    <link rel="stylesheet" href="https://stackpath.bootstrapcdn.com/bootstrap/4.3.1/css/bootstrap.min.css" integrity="sha384-ggOyR0iXCbMQv3Xipma34MD+dH/1fQ784/j6cY/iJTQUOhcWr7x9JvoRxT2MZw1T" crossorigin="anonymous">
</head>
<body>
    <div class="container mt-5">

    </div>
</body>
</html>
lorem
You could just start with listing the expenses, but that wouldn't look very nice, right? You should write some intro in the beginning, but what?
You'll get to that later, for now, just use the built-in lorem-ipsum generator:
<!--expenses.html-->

<div class="container">
    <div class="jumbotron">
        {% lorem 2 p random %}
    </div>
</div>
If you refresh the page, there will be 2 paragraphs from Lorem ipsum (that don't start with those words)!
lorem has 3 parameters and all three are optional:
{% lorem [count] [method] [random] %}
- number of the words/paragraphs that will be generated. It can be a number or a variable. The default value is 1.
- method will generate either:
- words (
w) - HTML paragraphs (
p) - plain text paragraphs (
b- this is the default value)
- words (
- random - the generated text won't start with 'Lorem ipsum'. The default is False. I think this is useful only if 'Lorem ipsum is bugging you (it does bug me and I usually add the random parameter).
You can read more on
loremin the documentation.
empty
Now let's list all the expenses we have. We don't have any expenses yet, but Django can handle that.
We just need to add an {% empty %} tag inside the for loop to cover that.
<!--tutorial/templates/tutorial/expenses.html-->
<h2>All expenses</h2>

{% for expense in expenses %}
    {{ expense }}
{% empty %}
    <div class="alert alert-danger">
        There are no expenses yet.
    </div>
{% endfor %}
If you refresh the page, you'll see that there's an alert saying there are no expenses yet.

The empty tag replaces the need for an if tag checking if the array is not empty.
If the array is empty, the part between the {% empty %} and {% endfor %} is shown.
If the array is not empty, that part will simply get skipped.
Let's check that.
You can read more on
emptyin the documentation.
Adding the expenses
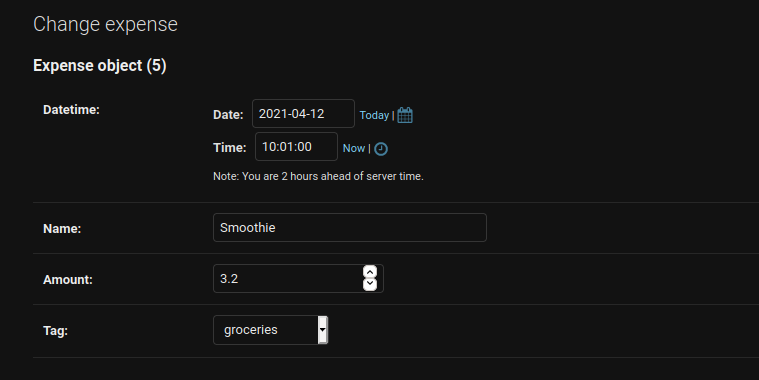
Stop the server with CtrlC, create the superuser and start the server again:
(venv)$ python manage.py createsuperuser
(venv)$ python manage.py runserver
Register the Expense model on the admin site in the admin.py file:
# tutorial/admin.py

from django.contrib import admin
from .models import Expense

admin.site.register(Expense)
Open http://127.0.0.1:8000/admin/, log in with the superuser you created, and add 5 expenses. Make 3 of those on the same date.
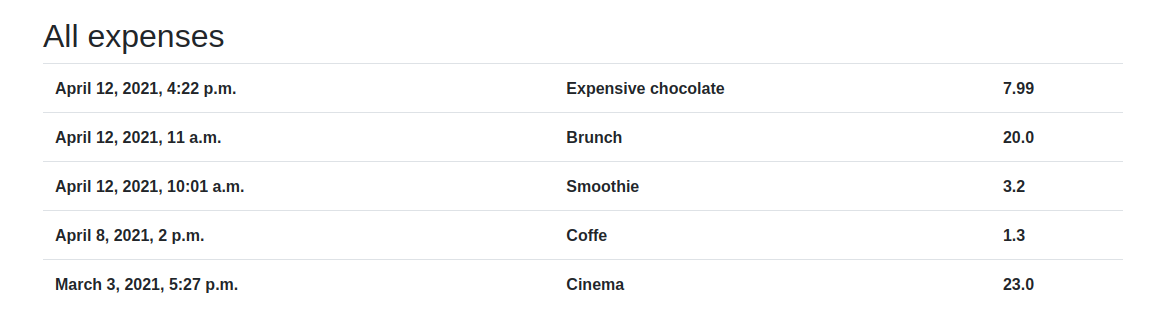
Change the expense display in expenses.html so it will show the details of each expense in a table:
<!--tutorial/templates/tutorial/expenses.html-->

<div class="container mt-5">
    <div class="jumbotron">
        {% lorem 2 p random %}
    </div>

    <h2>All expenses</h2>

    <table class="table">
        <tbody>
        {% for expense in expenses %}
            <tr>
            <th>{{ expense.datetime }}</th>
            <th>{{ expense.name }}</th>
            <th>{{ expense.amount }}</th>
            </tr>
        {% empty %}
            <div class="alert alert-danger">
                There are no expenses yet.
            </div>
        {% endfor %}
        </tbody>
    </table>
</div>
cycle
Let's say we want to add a little color to the expense table. We will alternate blue and gray with the white color.
We can create rows of that color with Bootstrap classes -
table-info, table-light and table-active' classes.
But we need a way to alternate those classes.
This is what cycle is for.
cycle outputs one of the arguments each time the tag is encountered (usually in the for-loop, but not necessarily).
When all arguments are exhausted, the cycle returns to the first argument.
<!--expenses.html-->
<h2>All expenses</h2>

<table class="table">
    <tbody>
    {% for expense in grouped_expenses %}
        <tr class="{% cycle 'table-info' 'table-light' 'table-active' 'table-light' %}"> <!-- cycle added -->
            <th>{{ expense.datetime }}</th>
            <th>{{  expense.name }}</th>
            <th>{{  expense.amount }}</th>
        </tr>
    {% empty %}
        <div class="alert alert-danger">
            There are no expenses yet.
        </div>
    {% endfor %}
    </tbody>
</table>
cycle in our case produces the Bootstrap class on each iteration. The first time will be table-info, the second time table-light, the third time table-active and so on and on, for every row in the table.
Check it out in the browser:

You can read more on
cyclein the documentation.
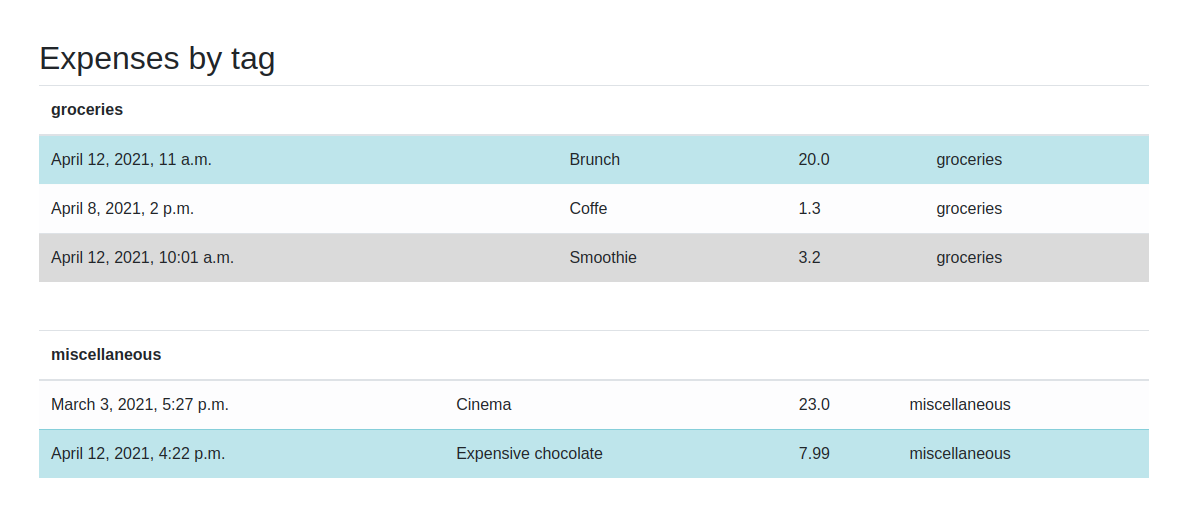
regroup
{% regroup %} groups a list of similar objects in groups based on a common attribute.
We'll use the regroup to group our expenses based on the expense tag.
Open models.py and add a tag to your Expense model.
# tutorial/models.py

from django.db import models

class Expense(models.Model):
  # this is new:
    MISCELLANEOUS = "misc"
    GROCERIES = "groc"
    HEALTH = "hlth"
    BILLS = "bill"
    EXPENSE_TAGS = [
        (MISCELLANEOUS, 'miscellaneous'),
        (GROCERIES, 'groceries'),
        (HEALTH, 'health'),
        (BILLS, 'bills'),
    ]

    datetime = models.DateTimeField()
    name = models.CharField(max_length=100)
    amount = models.FloatField()
    tag = models.CharField(max_length=20, choices=EXPENSE_TAGS, default=MISCELLANEOUS) # this is new
Check how the choices field is created.
You added a tag CharField with predefined choices that are listed in EXPENSE_TAGS.
We set the default value, so every expense, including the already created ones, has a tag.
Navigate to http://127.0.0.1:8000/admin/tutorial/expense/ and change tags for a few of the expenses (make sure at least three have the same tag).
You might imagine that regroup orders the input. It doesn't
The input has to be ordered from the start. It just checks when the selected attribute changes.
So if the input isn't organized, you will have more groups with the same attribute.
That's why we need to organize our expenses by tag for this part.
Open views.py and create another object to pass to the template:
# blog/views.py

from django.shortcuts import render
from tutorial.models import Expense


def expenses_list(request):
    expenses = Expense.objects.all()
    tag_expenses = Expense.objects.order_by('tag')

    return render(request, 'tutorial/expenses.html', {'expenses': expenses, 'tag_expenses': tag_expenses })
You made the same query as for the expenses, but you ordered it by the tag attribute.
We're passing the same list of objects to the same template because this is the simplest way for a tutorial. In reality, you'd probably want to have a different page and you wouldn't query the DB twice.
Open expenses.html and add this code at the bottom of the container div:
<!--tutorial/templates/tutorial/expenses.html-->

<h2 class="mt-5">Expenses by tag</h2>

{% regroup tag_expenses by tag as grouped_expenses %}
    {% for tag in grouped_expenses %}
        <table class="table mb-5">
            <thead>
            <tr><th colspan="4">{{ tag.grouper }}</th></tr>
            </thead>
            <tbody>
            {% for expense in tag.list %}
                <tr class="{% cycle 'table-info' 'table-light' 'table-active' 'table-light' %}">
                    <td>{{ expense.datetime }}</td>
                    <td>{{ expense.name }}</td>
                    <td>{{ expense.amount }}</td>
                    <td>{{ expense.tag }}</td>
                </tr>
            {% endfor %}
            </tbody>
        </table>
    {% endfor %}
In this code, there are 3 important parts:
{% regroup tag_expenses by tag as grouped_expenses %}{{ tag.grouper }}{% for expense in tag.list %}
{% regroup %} creates a list of group objects. A group object is a tuple-like object with two items.
The first one is a grouper.
This is the item the group was grouped by (in our case, each of the tags used).
The second one is a list of all the items in this group (in our case, all the expenses with a certain tag).
So now you don't access expense directly as you did in the first case, but with tag.list.
{% for expense in expenses %}

<!-- versus -->

{% for expense in tag.list %}
Everything else is either Bootstrap or something you already saw. Refresh the page.
You can read more on
regroupin the documentation.
resetcycle
As you can see in the picture above, cycle doesn't start its cycle again with the new table, but continues it.
So the first table starts with blue, but the next one starts with white.
If you want the tables to look consistent, you need to reset the cycle each time the new table starts with {% resetcycle %}.
Add it between the ends of the outer and inner for loop:
<!--tutorial/templates/tutorial/expenses.html-->

 {% for tag in grouped_expenses %}
    <table class="table mb-5">
        <thead>
        <tr><th colspan="4">{{ tag.grouper }}</th></tr>
        </thead>
        <tbody>
        {% for expense in tag.list %}
            <tr class="{% cycle 'table-info' 'table-light' 'table-active' 'table-light' %}">
                <td>{{ expense.datetime }}</td>
                <td>{{ expense.name }}</td>
                <td>{{ expense.amount }}</td>
                <td>{{ expense.tag }}</td>
            </tr>
        {% endfor %}
        </tbody>
    </table>
    {% resetcycle %} <!-- if you want each new table to start with blue row, you have to reset the cycle -->
{% endfor %}
You can read more on
resetcyclein the documentation.
comment
Maybe you're not sure what the resetcycle does? When that happens, it's usually a good idea to comment that part out and see what happens?
But if you try to comment it out with html comment, like this:
<!-- {% resetcycle %} -->
you'll see that this doesn't work.
You can comment it with the {% comment %} and you can even add a note.
{% comment "Uncomment if you want the table color cycle to reset" %}
{% resetcycle %}
{% endcomment %}
Alternatively, you can do it like this:
{# {% resetcycle %} #}You can read more on
commentin the documentation.
firstof
firstof finds the first "truthy" value and outputs it.
Python treats many values as "truthy" ones. These are non-empty strings, non-empty lists, non-empty sets, non-empty dictionaries, instances of your classes, True, integers/floats different than 0. As "falsy" it treats False, 0, None, empty lists, empty sets, empty dictionaries, empty strings, etc.
Let's say you have a dictionary of repetitive monthly expenses.
If the expense has been entered (paid), the value is set either to None or 0. If not, the value is some string about the expense.
You want to show the notice, alerting the user of the first expense that hasn't been entered yet (meaning it hasn't been paid yet).
Let's first create the dictionary.
Open views.py and add the dictionary:
# tutorial/views.py

from django.shortcuts import render
from tutorial.models import Expense


def expenses_list(request):
    expenses = Expense.objects.all()
    tag_expenses = Expense.objects.order_by('tag')

    # dictionary with data
    monthly_expenses = {
        "rent": 0,
        "insurance": None,
        "internet": "You haven't payed your internet bill (25.00€) yet.",
        "mobile_phone": "You haven't payed your mobile phone bill (32.50€) yet."
    }

    return render(request, 'tutorial/expenses.html', {'expenses': expenses, 'tag_expenses': tag_expenses, 'monthly_expenses': monthly_expenses}) # dictionary passed to the template
Now you can use the firstof to show the first unpaid expense somewhere at the top of the template:
<!--expenses.html-->

    {% firstof monthly_expenses.rent monthly_expenses.insurance monthly_expenses.internet monthly_expenses.mobile_phone as first_unpaid %}
    {% if first_unpaid %}
    <div class="alert alert-warning">
        You haven't paid your {{ first_unpaid }} yet.
    </div>
    {% endif %}
You've listed all the variables you want firstof to check and Django went like this (read in Django voice):
monthly_expenses.rent-> rent is Falsy(0), I don't care about thismonthly_expenses.insurance-> insurance is Falsy(None), I don't care about thismonthly_expenses.internet-> this is a Truthy value, I'm outputting thismonthly_expenses.mobile_phone-> although this is a Truthy value, I don't care about this, I already found my value- You could provide an additional default value that would be assigned if nothing else would
Then you assigned the first truthy value to a variable named first_unpaid and you can now use it in your code.
You checked if it exists and if it does, you displayed a notification about the first unpaid bill.

You can read more on
firstofin the documentation.
ifchanged
{% ifchanged %} can only be used in a loop. It can either check if the content in the block changed and if it did, it displays it, or
checks if one or more of the given variables changed and displays whatever is between the tags.
You can also use an else clause within (the same way you would use else in a simple if).
For now we displayed unordered expenses under All expenses title.
Open views.py and change expenses = Expense.objects.all() to this:
# views.py

expenses = Expense.objects.order_by('-datetime')
Everything else in views.py remains unchanged.
Now edit the table under All expenses table to include an {% ifchanged %}tags:
<!--tutorial/templates/tutorial/expenses.html-->
<h2>All expenses</h2>
<table class="table">
<tbody>
{% for expense in expenses %}
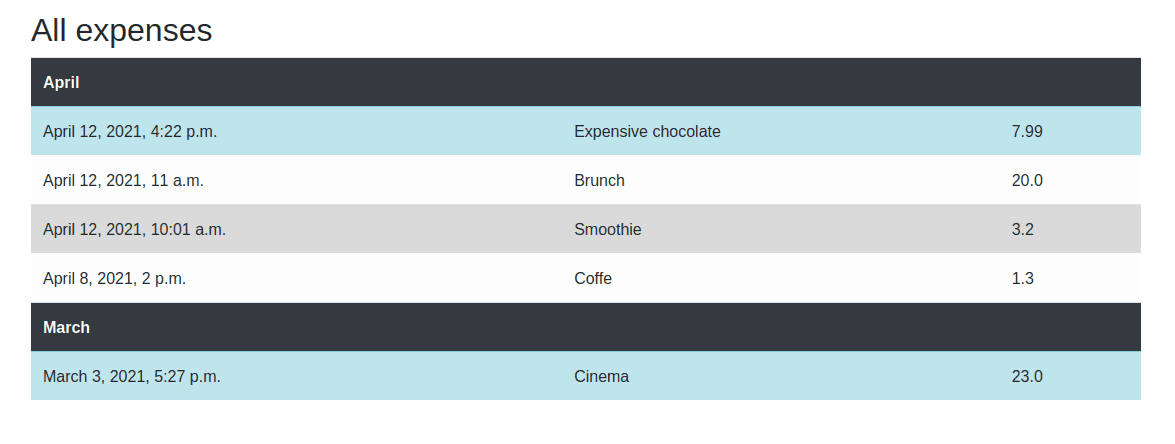
{% ifchanged %}<tr><th colspan="4" class="table-dark">{{ expense.datetime|date:"F" }}</th></tr>{% endifchanged %} <!-- this is new -->
<tr class="{% cycle 'table-info' 'table-light' 'table-active' 'table-light' %}">
<td>{{ expense.datetime }}</td>
<td>{{ expense.name }}</td>
<td>{{ expense.amount }}</td>
</tr>
{% empty %}
<div class="alert alert-danger">
There are no expenses yet.
</div>
{% endfor %}
</tbody>
</table>
If the month changes, the code inside the {% ifchanged %} tags is displayed.
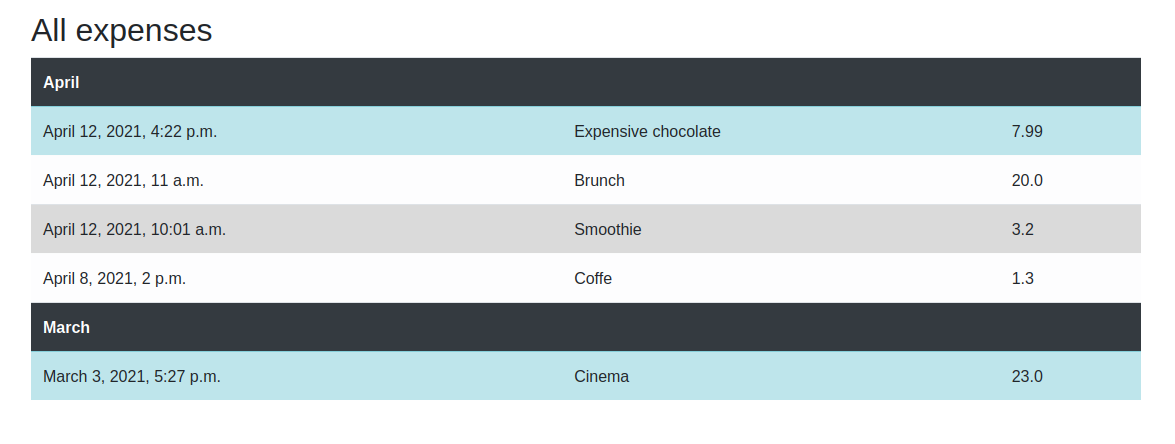
For this to work properly, you have to have expenses from at least two different months.
You can read more on
ifchangedin the documentation.
Conclusion
In this post you learned about 8 tags:
- lorem
- empty
- cycle
- regroup
- resetcycle
- comment
- firstof
- ifchanged
You might use them often (I use {% empty %} regularly) or you might never use a tag. Don't force them, use them cautiously.
However, it's good to know they're there and it's fun to feel like a magician when you produce something with just one line of code.
Those are not all the tags, you can see all of them in the documentation. Here I also presented one way of using it, there can be more than one way or they have additional parameters that we didn't explore. When your building your next Django project and trying to do something in the template, remember there might be a tag for this.