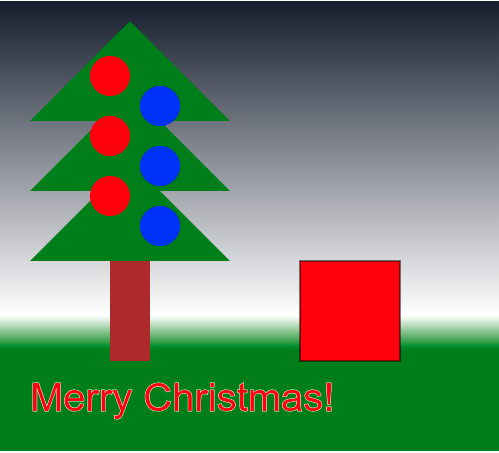
HTML Canvas Christmas tutorial - part 2: REPETITION and DEPTH

I'm passionate about learning new things -- both for myself and for teaching others. I'm a fan of Python and Django and want to know everything there is about those two. When I'm not writing code or a blog, I'm probably trying something new, reading, or spending time outside with my family.
You learned a lot in the previous tutorial, but let's be honest, the Christmas tree needs presents underneath. So let's add them and improve our knowledge.
What will you do?
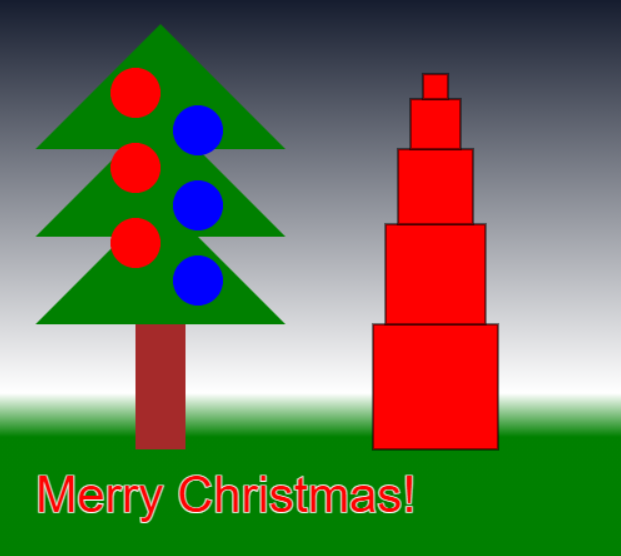
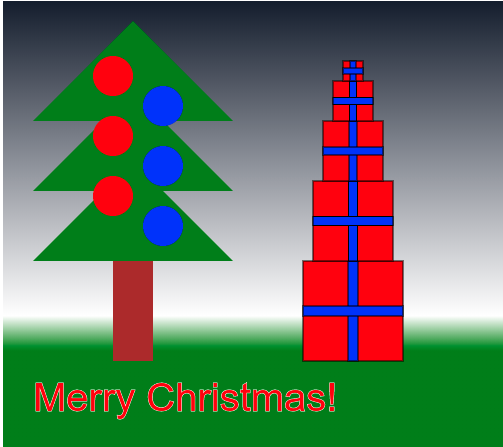
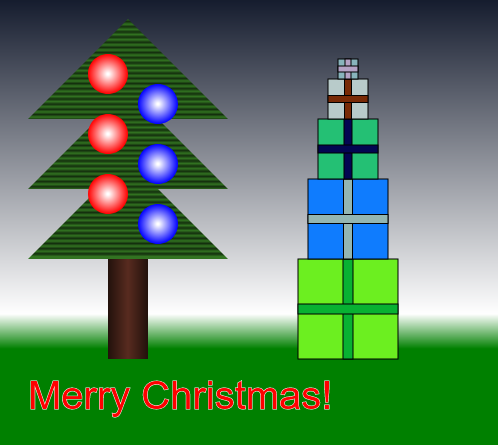
What's Christmas without presents!? We are going to add a stack of them next to the tree. Each next one is going to be smaller and they're gonna be different colors with ribbons of different colors.
We'll make the trunk more 3D by creating a simple linear-gradient effect - it will be darker on both sides and lighter in the middle.
On the tree crown, we'll create a little texture by exchanging lighter and darker green.
We are also going to create 3D baubles with a radial gradient.
Prerequisites
- basic knowledge of HTML
- basic knowledge of JavaScript
- basic knowledge of HTML Canvas
We covered the basics of HTML Canvas in the previous tutorial
Presents
We're going to draw 5 presents. Each of them will be built from 3 rectangles. The first one will be square for the box. Two thin and long will build the ribbon (one vertical and one horizontal). They will be stacked one on top of another. The bottom one will be largest while others will be gradually smaller. So let's get to work.
Boxes
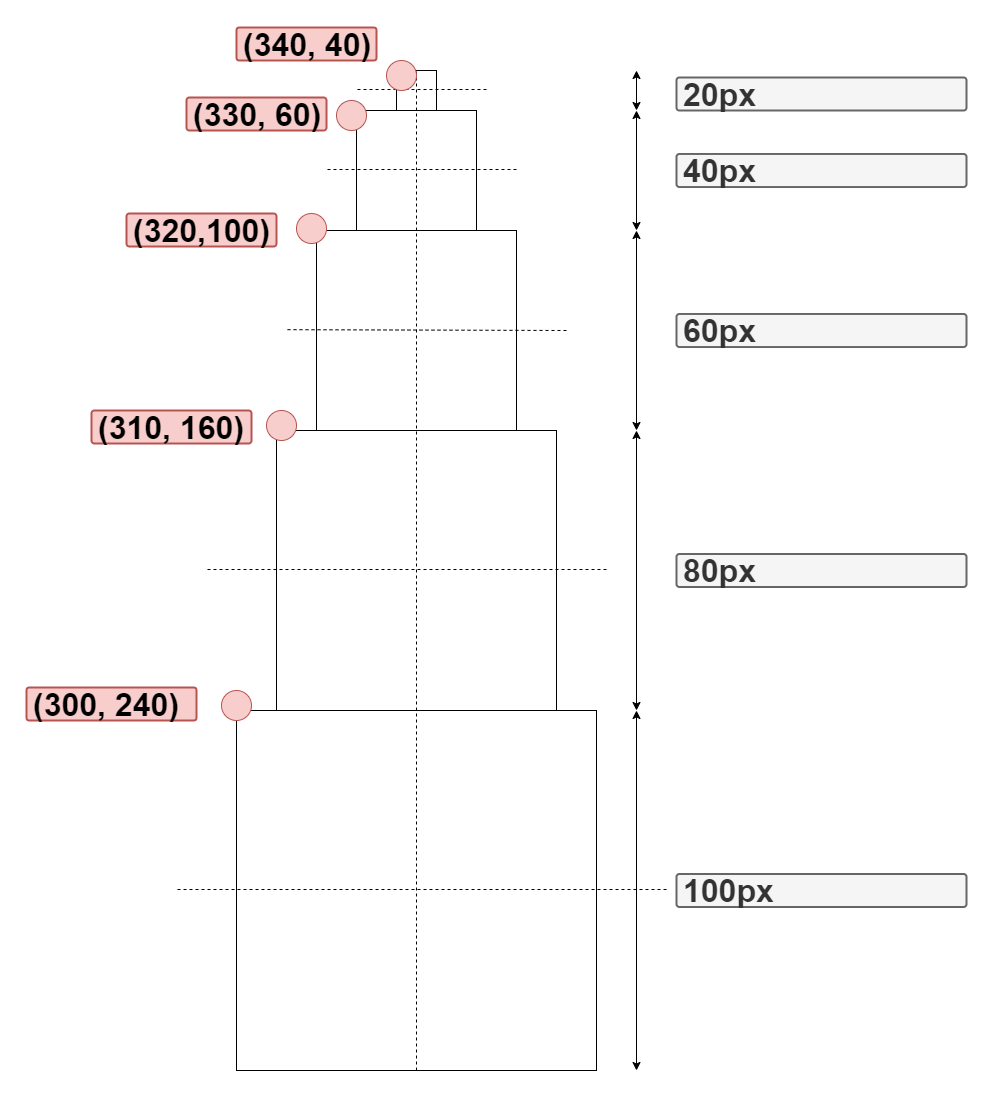
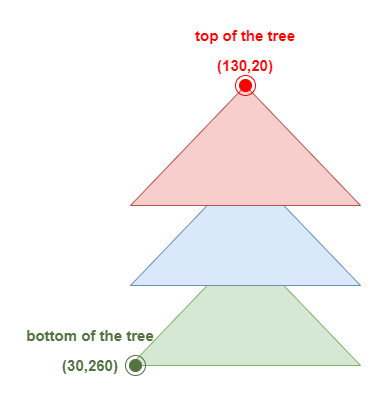
Drawing of each present starts at its top left corner. You can see the coordinates of their top-left corners in the image below.
First, to the bottom of canvas.js add values for the gift:
// code from the previous tutorial is above that comment

var height_gift = 100
var width_gift = height_gift // you want square
var x_gift = 300
var y_gift = 260
As you can see in the image, the top left corner of the first gift is positioned at x=300 and y=260. Its height and width are 100px. Next, you need to draw this box to the canvas.
// code from the previous tutorial is above that comment

var height_gift = 100
var width_gift = height_gift // you want square
var x_gift = 300
var y_gift = 260

ctx.strokeStyle = "black";
ctx.fillStyle = "red";

ctx.fillRect(x_gift, y_gift, width_gift, height_gift);
ctx.strokeRect(x_gift, y_gift, width_gift, height_gift);
It's filled with red color by using fillRect and outlined with black line by using strokeRect. Open canvas.html in your browser to see the red square next to the Christmas tree.
The first one is there but we need to create 4 more. Replace code you've just added with this for loop:
// code from the previous tutorial is above that comment

var height_gift = 100
var width_gift = height_gift // you want square
var x_gift = 300
var y_gift = 260

for (var j = 0; j < 5; j++) {

   ctx.strokeStyle = "black";
   ctx.fillStyle = "red";

   ctx.fillRect(x_gift, y_gift, width_gift, height_gift);
   ctx.strokeRect(x_gift, y_gift, width_gift, height_gift);

   height_gift = ((4 - j) * 20)
   width_gift = height_gift
   x_gift = x_gift + 10
   y_gift = y_gift - height_gift

}
As we can see from the diagram, each next gift will be 20px lower height_gift = ((4 - j) * 20) and 20px narrower width_gift = height_gift. If we want a nice pyramid-shaped structure, we need to move each next gift half of that 20px to the right x_gift = x_gift + 10.
While we start drawing each gift in the bottom left corner we need to start the next gift exactly its height higher than we started the last gift y_gift = y_gift - height_gift (to go higher you need to lower the y). We don't want to alter the numbers for the first gift, so we'll change our values at the end of our for loop to set them for the next gift.
Refresh your browser. You should see 5 red boxes stacked one on another.
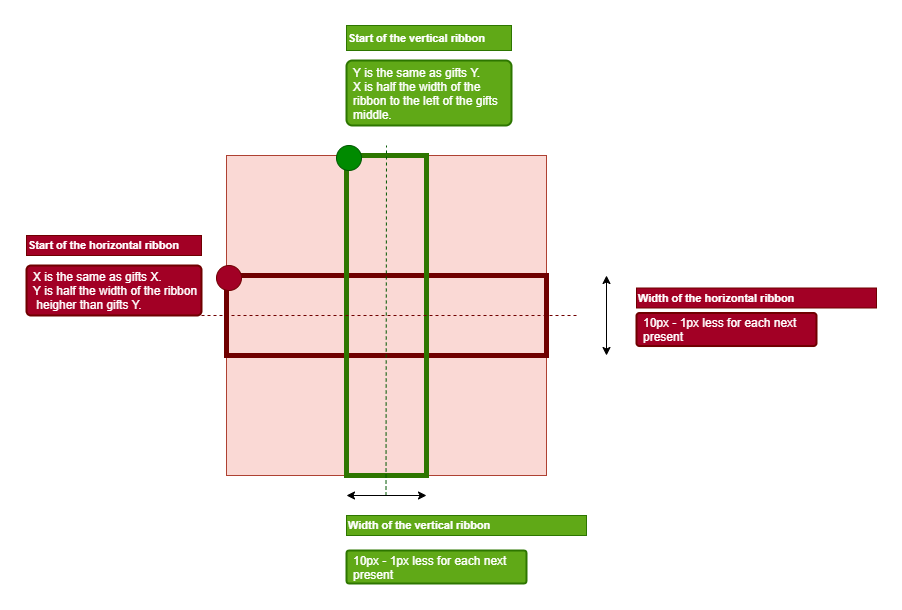
Ribbon
Now we only have 5 red boxes, stacked on one another. If we want them to look like gifts, we need to put a ribbon on them. We'll keep it simple and add vertical and horizontal blue stripes to it.
Add code that will draw the ribbon, like this:
// code from the previous tutorial is above that comment

var height_gift = 100
var width_gift = height_gift // you want square
var x_gift = 300
var y_gift = 260

for (var j = 0; j < 5; j++) {

   ctx.strokeStyle = "black";
   ctx.fillStyle = "red";

   ctx.fillRect(x_gift, y_gift, width_gift, height_gift);
   ctx.strokeRect(x_gift, y_gift, width_gift, height_gift);

   ctx.fillStyle = "blue";

   var ribbon_width = 10 - j;

   // vertical ribbon
   ctx.fillRect(x_gift + width_gift/2 - ribbon_width/2 , y_gift, ribbon_width, height_gift);
   ctx.strokeRect(x_gift + width_gift/2 - ribbon_width/2 , y_gift, ribbon_width, height_gift);

   // horizontal ribbon
   ctx.fillRect(x_gift, y_gift + height_gift/2 - ribbon_width/2, width_gift, ribbon_width);
   ctx.strokeRect(x_gift, y_gift + height_gift/2 - ribbon_width/2, width_gift, ribbon_width);

   height_gift = ((4 - j) * 20)
   width_gift = height_gift
   x_gift = x_gift + 10
   y_gift = y_gift - height_gift

}
The smaller the gift, the narrower will be the ribbon. The middle of the ribbon will align with the middle of the gift.
But, because we start drawing a rectangle at its top left, we need to move half the width of the ribbon higher (on the horizontal ribbon) y_gift + height_gift/2 - ribbon_width/2 or half the ribbon width to the left (on the vertical ribbon) x_gift + width_gift/2 - ribbon_width/2. As with the boxes, we stroke a black line around the ribbons.
Refresh the browser to see 5 gifts with ribbons:
Colorful presents
Let's make presents colorful to make them a little more appealing. We can do that by assigning each box and each ribbon color randomly. At the bottom of the canvas.js add functions to generate random color for presents:
function randomInteger(max, min) {
   return Math.floor(Math.random()*(max-min)) + min;
}

function randomColor(){
   return 'rgb(' + randomInteger(0, 255) + ',' + randomInteger(0, 255) + ',' + randomInteger(0, 255) +')';
}
The first function that returns a random integer between a given minimum and maximum number. The second one returns color in RGB format. It uses randomInteger function to generate a number between 0 and 255 to create R, G, and B parts of the RGB.
Assign the return of the randomColor function to fillStyle ctx.fillStyle = randomColor(); of both, boxes and ribbons.
// code from previous tutorial is above that comment

var height_gift = 100
var width_gift = height_gift // you want square
var x_gift = 300
var y_gift = 260

for (var j = 0; j < 5; j++) {

   ctx.strokeStyle = "black";
   ctx.fillStyle = randomColor();

   ctx.fillRect(x_gift, y_gift, width_gift, height_gift);
   ctx.strokeRect(x_gift, y_gift, width_gift, height_gift);

   ctx.fillStyle = randomColor();

   var ribbon_width = 10 - j;

   // vertical ribbon
   ctx.fillRect(x_gift + width_gift/2 - ribbon_width/2 , y_gift, ribbon_width, height_gift);
   ctx.strokeRect(x_gift + width_gift/2 - ribbon_width/2 , y_gift, ribbon_width, height_gift);

   // horizontal ribbon
   ctx.fillRect(x_gift, y_gift + height_gift/2 - ribbon_width/2, width_gift, ribbon_width);
   ctx.strokeRect(x_gift, y_gift + height_gift/2 - ribbon_width/2, width_gift, ribbon_width);


   height_gift = ((4 - j) * 20)
   width_gift = height_gift
   x_gift = x_gift + 10
   y_gift = y_gift - height_gift

}

function randomInteger(max, min) {
   return Math.floor(Math.random()*(max-min)) + min;
}

function randomColor(){
   return 'rgb(' + randomInteger(0, 255) + ',' + randomInteger(0, 255) + ',' + randomInteger(0, 255) +')';
}
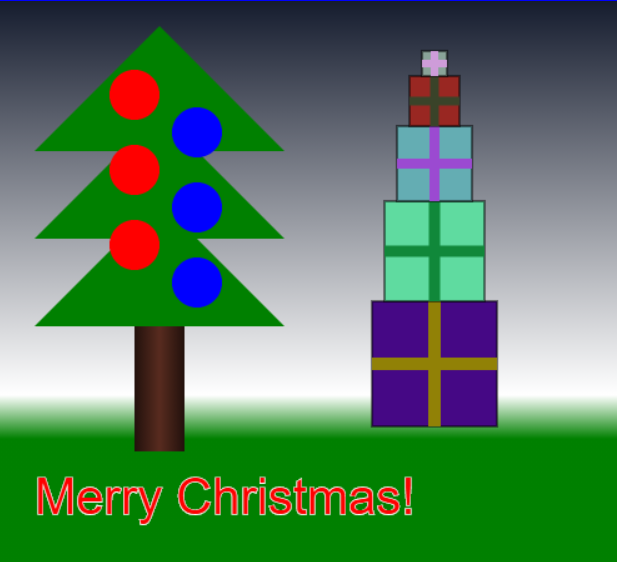
Refresh your browser again and you should see colorful gifts and ribbons. They will change after every refresh:

3D Trunk
In previous tutorial we drew brown trunk by setting solid color and filling rectangle with it:
ctx.fillStyle = "brown";
ctx.fillRect(110, 260, 40, 100);
To create a 3D effect we need to use a linear gradient instead of solid color. Therefore, edit canvas.js and replace the previous code for drawing trunk with a new one:
var gradTrunk = ctx.createLinearGradient(110, 0, 150, 0);

gradTrunk.addColorStop(0, "#22110c");
gradTrunk.addColorStop(0.5, "#582b1f");
gradTrunk.addColorStop(1, "#22110c");

ctx.fillStyle = gradTrunk;
ctx.fillRect(110, 260, 40, 100);
The linear gradient can be created the same way as for the background in the previous tutorial. The gradient is changing color over x axis. We start dark brown at left side of the trunk gradTrunk.addColorStop(0, "#22110c");. At the middle we use lighter brown gradTrunk.addColorStop(0.5, "#582b1f"); and the again the dark one on the right side of trunk gradTrunk.addColorStop(1, "#22110c");. Doing that we create an effect where the middle seems closer than the edges - it gives you a 3D feeling of the object.
Tree with texture
To give a little more textured feeling to our tree crown, we are also going to use a linear gradient. Instead of changing color in the gradient 2 or 3 times with different colors, we are going to switch between 2 shades of green very often. This will give the effect of corrugated cardboard, the way you (might) created your Christmas cards when you were a kid.
The drawing part (moveTo, lineTo) will stay the same.
So far you should have this code written to draw a tree crown's triangles:
function drawTriangle(x, y) {

   ctx.fillStyle = "green";
   ctx.beginPath();
   ctx.moveTo(x, y);
   ctx.lineTo(x + 100, y-100);
   ctx.lineTo(x + 200, y);
   ctx.fill();

}

drawTriangle(30, 120);
drawTriangle(30, 190);
drawTriangle(30, 260);
Let's add function parameter fillColor and define gradient from the top to the bottome of the tree crown:
   function drawTriangle(x, y, fillColor) {
      ctx.fillStyle = fillColor;

      ctx.beginPath();

      ctx.moveTo(x, y);

      ctx.lineTo(x + 100, y-100);

      ctx.lineTo(x + 200, y);

      ctx.fill();
   }


   // background code


   var gradTree = ctx.createLinearGradient(0, 20, 0, 260);

   for (var n = 0; n < 100; n++) {

       var decimal_number = n * 0.01

       if (n%2 === 0) {
           gradTree.addColorStop(decimal_number, "#142f0e");
       } else {
           gradTree.addColorStop(decimal_number, "#327321");
       }
   }

   drawTriangle(30, 120, gradTree); //red triangle
   drawTriangle(30, 190, gradTree); //blue triangle
   drawTriangle(30, 260, gradTree); //green triangle

}
As before, we need to define the gradient (ctx.createLinearGradient(x0, y0, x1, y1). To create horizontal lines xStart and xEnd are set to 0. The first Y will be set at the top of the tree y=20 and the second one at the bottom of the tree y=260.
Using for loop we switch between darker (#142f0e) and lighter (#327321) green on every 0.01 - 100 times throughout the tree. When n is even, the color is a darker green, when odd the color is lighter green.
Because all values of addColorStop are between 0 (start of the gradient) and 1 (end of the gradient, we use n to calculate where in the gradient we are with our addColorStop(value0to1, color). The generated gradient is used as an input parameter for the updated drawTriangle function.
Baubles
Let's try to give the baubles a 3D feeling too. Because baubles are in the shape of a circle, the 3D feeling can't be accomplished by a linear gradient. But there is another type of gradient that will give us the desired result - radial gradient.
It's created with a function createRadialGradient(x0,y0,r0,x1,y1,r1).
It seems like there's a lot of parameters (6!). That's because you're creating 2 circles where each of them needs 3 parameters. The first three parameters are for the starting circle of the gradient and the last 3 parameters are for the second one.
Those 3 parameters are:
- x coordinate for the circle
- y coordinate for the circle
- radius
Right now baubles are drawn using this for loop:
var y = 75;

for (var i = 0; i < 6; i++) {

   ctx.beginPath();

   if (i%2 == 0) {

       ctx.fillStyle = 'red';

       ctx.arc(110 , y, 20, 0, 2 * Math.PI);

       ctx.fill();

   } else {

       ctx.fillStyle = 'blue';

       ctx.arc(160, y, 20, 0, 2 * Math.PI);

       ctx.fill();

   }

y = y + 30;

}
Update it to use a circular gradient for all the baubles:
var y = 75;

for (var i = 0; i < 6; i++) {

   ctx.beginPath();

   if (i%2 == 0) {
      var gradient = ctx.createRadialGradient(110, y, 1, 110, y, 20);

      gradient.addColorStop(0, 'white');
      gradient.addColorStop(1, `red`);
       ctx.fillStyle = gradient;
       ctx.arc(110 , y, 20, 0, 2 * Math.PI);
       ctx.fill();
   } else {
       var gradient = ctx.createRadialGradient(160, y, 1, 160, y, 20);

       gradient.addColorStop(0, 'white');
       gradient.addColorStop(1, `blue`);
       ctx.fillStyle = gradient;
       ctx.arc(160, y, 20, 0, 2 * Math.PI);
       ctx.fill();
   }

y = y + 30;

}
Gradient with two concetric circles var gradient = ctx.createRadialGradient(160, y, 1, 160, y, 20); improves 3D impression. baubles now change color from white gradient.addColorStop(0, 'white'); in the center to red/blue gradient.addColorStop(1,blue);.
Improvement of the 3D bauble
The baubles we created definitely look better than the old ones. But it could look more natural if the white circle would give the impression that the bauble is reflecting the light that is coming from the side. We can accomplish that by leaving the center of the second circle where it is (x1 = x1, y1 = y1) and moving the center of the first circle a little to the top (y0 = y0 - 10) right (x0 = x0 + 10).
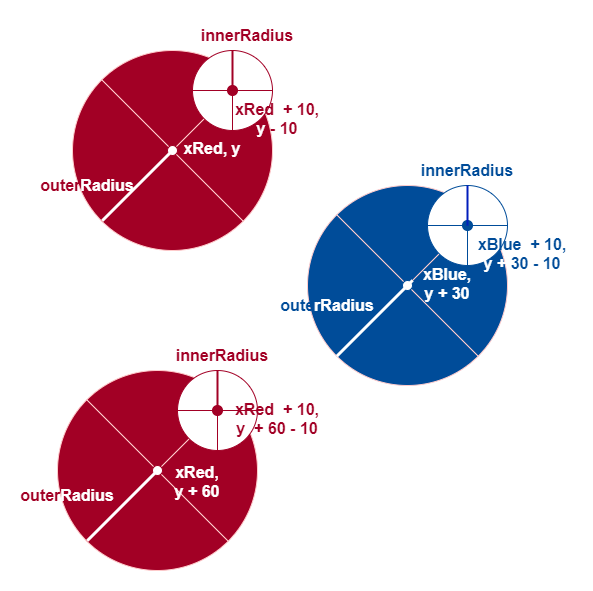
Let's edit baubles part to use eccentric circles to improve 3D design:
var xRed = 110
var xBlue = 160
var y = 75
var outerRadius = 20
var innerRadius = 1

for (var i = 0; i < 6; i++) {

   ctx.beginPath();

   if (i % 2 == 0) {

       var gradientRed = ctx.createRadialGradient(xRed, y, outerRadius, xRed + 10, y - 10, innerRadius);

       gradientRed.addColorStop(0, 'red');
       gradientRed.addColorStop(1, 'white');

       ctx.fillStyle = gradientRed;
       ctx.arc(xRed, y, outerRadius, 0, 2 * Math.PI);
       ctx.fill();

   } else {

       var gradientBlue = ctx.createRadialGradient(xBlue, y, outerRadius, xBlue + 10, y - 10, innerRadius);

       gradientBlue.addColorStop(0, 'blue');
       gradientBlue.addColorStop(1, 'white');

       ctx.fillStyle = gradientBlue;
       ctx.arc(xBlue, y, outerRadius, 0, 2 * Math.PI);
       ctx.fill();

   }

   y = y + 30;

}

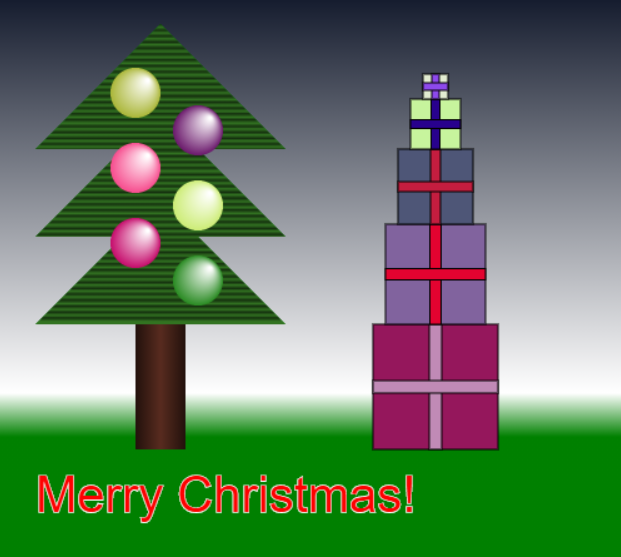
The tree looks adorable, but there is still a little room for improvement. Let's change the bauble colors from red/blue to random colors. Since we already created the function that provides a random color, this is easy. Instead of blue/red color for addColorStop for 0, call the randomColor() function.
Change gradientBlue.addColorStop(0, 'blue'); to gradientBlue.addColorStop(0, randomColor()); and change gradientRed.addColorStop(0, 'red'); to gradientRed.addColorStop(0, randomColor());.
Conclusion
Isn't that tree you created yourself beautiful? And that giant stack of presents!
In this tutorial, you learned how to give a little more depth to your canvas creation with the usage of gradients.
For the circle-shaped objects, you can use createRadialGradient to give a feeling of light reflecting from the object.
You are not limited to only a few stops for the gradients, you can add as many as 100 (and more!) to create an interesting effect.
Besides the fillRect you already knew, you also learned about strokeRect.
You need to use at least one of those if you want to create an object.
For both of those, you can choose separate colors.
You should also have got the basic idea of how to use math for drawing multiple objects on canvas
This is not canvas related, but you also learned how to create a random RGB color code for your objects.
You can use that knowledge to apply random colors to your webpage elements.
And you created a piece of art, your mother would definitely hang on the fridge, if that would be possible (;